
I decided to start a series of samples that would explore different textures and
how these textures will translate by 3d printing. The easiest way I found to
generate the models I need was with a 3d program popular with designing
environments, Bryce 7 Pro. Within minutes it’s easy to create mountains or
other landscape elements and export the model as a mesh.
Unfortunately, the ease ends here, or at least for me since my background with
working with 3d programs is very limited. Through my trial and error, I
eventually developed a workflow that provided me with a model that could be 3d
printed.
Here is a summary:
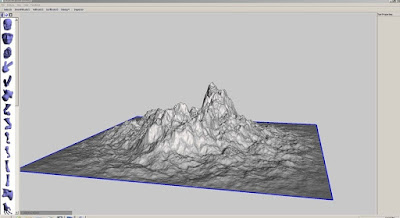
1) Bryce 7 Pro, basically start up the program and click on the mountain icon
and a wire frame mountain appears. Playing around with the edit features will
model the mountain with an infinite array of features. I started with a typical
projection with fractal eroded surfaces. I exported the wire frame as a wavefront .obj file.
 |
| Bryce working environment. |
2) Meshmixer 07, is an open source program and a very important one for me since it's relatively easy to learn and it was my best option of capping the mountain I made in Bryce. For 3d printing, a model must be a solid. The mountain I made
in Bryce is basically hollow with an open bottom, essentially a shell. There is a great YouTube video showing how to enclose a model such as this here. The modified mesh was exported as an .obj file.
 |
| Meshmix working environment. |
 |
| Under the mountain model before it's capped. |
3) Rhino 4.0, is a very popular and powerful 3d design program. I would have
used a simpler program like Google Sketchup, but my file was too complex and it
couldn't handle it. Rhino has an evaluation copy that will only allow 25 saves,
this is what I used. This program was important for 2 reasons (which I couldn't
solve with Meshmixer): I needed to scale the object and I needed to orient it
properly within the Cartesian space coordinates. I quickly discovered this problem
after trying to print; the model was on it's side and only about 8mm square in
size. Rhino was able to correct all of this and export as an .obj file.
 |
| Rhino working environment. Here the model is shown positioned upside down in the coordinate system. It would slice and print this way if left unrotated. |
4) Meshlab 1.3.0a, is an open source program used for merging and fixing meshes
for printing. I ran my model through this and exported as a .stl file. But once
I started to slice my .stl file with Skeinforge, I found that I didn't quite fix
all my problems with Meshlab. I still had a hole in my model somewhere.
It took an hour to slice and I didn't want to go back and try to fix it, so I
printed the model with the errors. The only problems I could see
with the print was an irregular start on the base and the print printed solid
even though I had my fill ratio set at 10%.
 |
| Even though base was capped square, the print started irregularly. |
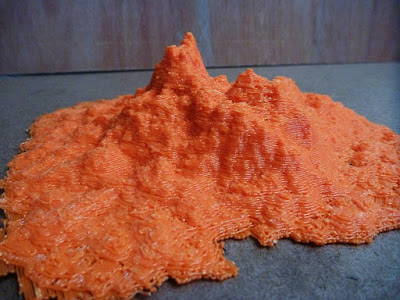
I also had a slight problem with warping. The print on one side lifted enough
that it actually cracked the glass, but the print overall is quite flat.
 |
| Mountain |
Aesthetically, I'm not too happy with the overall look. It kind of reminds me of
the mealy texture of paper pulp. Also the "architectural" resolution is poor,
but this is probably due to the 3d modeling.
 |
 |
No comments:
Post a Comment