Showing posts with label RepRapPro Mendel. Show all posts

Wednesday, June 19, 2013

RepRapPro Mendel (part 7)

The RepRapPro Mendel has been a great printer, but it’s been plagued by a number of issues which arise from prolonged print runs and constant use. This, I believe, is not indicative of an inferior machine, but just the nature of DIY printers in general.

This entry will survey more of the problems I’ve had with the RepRapPro Mendel. Some of these problems must be prevalent with their printers at large since RepRapPro has made some recent design changes to correct them. Most of these problems, I’ve had to solve on my own.

Here are my recent issues:

I’ve had problems with the parts which are exposed to the heat of the bed. This is probably because the parts are made with PLA rather than ABS. PLA has a lower tolerance for heat.

The Y belt clamp has been a continual headache. The heat from the bed softens the clamps and this causes the belt to slip. The screws are instrumental in this problem by conducting too much heat through the clamp. I’ve had to make several adjustments or modifications to keep the belt properly tensioned.


The Y axis motor mount has warped considerably over time and had to be reprinted. RepRapPro now sends this out as a laser cut wood part in their kits. I remade the part in ABS which should hold up fine for my use.


The next problem I’ve had is with the bowden cable attachment at the extruder side. The clip which holds it in place would wiggle its way out and the cable would detach. I lost several long print runs because of this. I fixed it by simply tying the clip in place with a zip tie.


The next problem is with the Melzi controller. I just haven’t had much luck with this board. This time it's with the mini USB connector. It separated from the PC board. Fortunately it wasn’t damaged and I could solder it back in place, but it wasn’t a very easy task to accomplish. The 5 pins are very small and it  required some very steady work and I think some luck to get it in place.


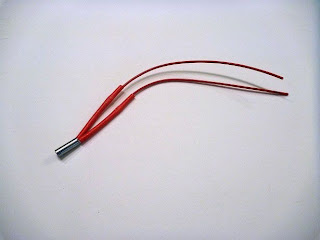
The last problem has been a reoccurring failure of the heat resistor, but RepRapPro has made a component change and now sells a more robust ceramic heat resistor. The replacement part I found as a substitute has been easier to install, but hasn’t provided any longer service than the OEM part. I’ve purchased replacements for all my RepRapPro hot ends with the new ceramic resistor.


Once again, I think the RepRapPro Mendel is a great machine and I would recommend it highly to anyone who is looking to purchase their first printer. It’s a very nice system and it’s continually improved.

There are just inherent weaknesses in the DIY system. I hope that by finding these weaknesses in all of my printers, I’ll be able to perfect the technology for my use in creating sculpture. This has been my underlying rationale for building the printers I have so far.

Addendum Aug. 18, 2013

I can't seem to keep the belts on my XY axes tight. My best solution was to drill holes in the X carriage and run the belts through them and then clamp with nylon ties.

 I did this also for the bed.


I also had a problem with one of the PLA printed pulleys. I replaced both XY pulleys with aluminum T2.5's that I found on eBay. Since the pulley diameter is larger than the OEM versions, I had to re-calibrate the axes.


Monday, May 20, 2013

RepRapPro Mendel (Part 6)

I haven't had very good luck with the Melzi board. I burned out the drivers and MOSFETs on my first board (I've never been able to determine the cause). Now I have a burned out heat bed connector. I’m primarily extruding ABS which requires a higher temperature for the bed and I’ve been running the printer for very long periods of time. This may be the reason for this burn out. I’m not
entirely confident that the Melzi board is robust enough for 24 hour runs.


Unfortunately, a simple replacement of the connector isn’t going to work in this case. The burn destroyed the PCB tracing and makes it impossible to solder a new component. In order to have a working bed, I rewired the power leads directly to the power supply and added a switch for manual control. Since no harm has come to the thermistor, I can at least monitor the temperature. This seems to work fine, but I’ve lost automatic control.

I hesitate to buy another Melzi board anytime soon, but if I do I may reinforce the bed connection. A seller of a Sanguinololu board I purchased recently has a recommendation to do exactly this.


The Melzi board is not the only area where I’ve had problems. I’ve also burned out 2 power resistors on the hot end. Once again, I think long periods of operation has taken its toll, but I also suspect that possible damage during installation may also be a factor. Even with additional boring of the hot end’s heat sink, it’s very difficult to install the resistor in the cavity without physically forcing it. This scrapes the surface and causes damage.

Top resistor is the original supplied in the kit and the bottom resistor is from Mouser


The resistors are just too big and coupled with a slight curve in its body, it makes for a difficult fit. I've found a different resistor that works better. It’s slightly narrower, but with a couple wraps of Kapton tape, it makes a snug fit. It can be found at Mouser Electronics:

71-RS2B-2.7/R                             
MFG Part No:RS02B2R700FS70
Vishay Wirewound Resistors

The resistor fits snug from end to end with a couple runs of Kapton tape and a little heat transfer compound


Friday, March 1, 2013

RepRapPro Mendel (part 5)

The generic ABS profile doesn't work for the RepRapPro Mendel and I've been asked to share the profile I've made. It's not perfect, but it's a good starting point.

My basic ABS profile starts with the Mendel-PLA-05-03 profile as a base. The following screenshots will show changes that I've made. You'll have to just compare them and make the appropriate changes.

Carve


I've had relative good results with both .4 and .3 layer heights.

Cool


Activate cool with a minor adjustment.

Dimension


Keep in mind that Filament Diameter must reflect your own. My 1.75mm filament averages to about 1.68mm.

Inset


It's recommended to keep the Infill Width over Thickness (ratio) the same as the Edge width over Height (ratio) as in Carve.


Oozestep


Some relavent changes in this profile.

Speed


Quite a few alterations on this one.


Here are 2 examples that I printed with exactly these settings with a hotend temp set at 230 c. degrees.


Tuesday, February 12, 2013

RepRapPro Mendel (part 4)

The RepRapPro Mendel is set up with a Bowden cabled extruder running 1.75 PLA. My other printers use a direct drive MakerGear system and have extruded only 3mm ABS. Because of this my learning curve has been higher than it should be with this printer.

Using the PLA profile in Skeinforge and the supplied PLA filament, I was able to print the test.


It’s not a great print, but the printer moved in the proper directions, properly extruded PLA and didn't spew out blobs or jam up. A much better result than my first printing attempt on my Prusa Mendel reprap build.

The next test, I decided to print a replacement gear for the extruder. This is where it became difficult. I spent a lot of time tweaking and adjusting, trying to get a decent print. The extruder seemed not to be working well. After adjusting the extruder gears and the tension idler, changing the extruder temp and feedrate/ flowrate,  and adjusting the stepper voltage driving the extruder , I started to get something working.


Cooling the PLA in delicate areas is very difficult without a fan. It's difficult not to end up with a melted blob.


It's obvious that much tweaking in the slicer profile is needed to nicely print this model


It  seems most of my problems centered on one specific variable which I wasn't aware of. My other 2 printers use Sprinter firmware and this is my 1st time using Marlin. Marlin adds a M109 command in the gcode which specifies a set starting temperature. In this case, it's 200 degrees C. Even though the temperature was set higher in Ponterface during the start of the build the temperature would drop to 200 C. This was creating my extruder problems. I wasn't getting enough filament driven because it wasn't melting well enough. This command isn't given by Sprinter firmware, so it took me a long while to notice this initial drop in temperature. It's easily changed by changing the M109 temp setting in the command window or by editing the gcode.

After experiencing the problems inherent with PLA, I decided to switch to what I am more familiar with: ABS. For the first print, I decided to use the same profile that was used for my PLA print tests.


Using the PLA profile created many problems, the most obvious one is stringing.

There’s a generic ABS profile included with Skeinforge, but it doesn't work. I added relevant changes that the PLA  profile utilizes and did some minor tweaking using portions from my own ABS profiles that I use with my Prusa Mendel.
thing:34942


Overall, I've made a good average ABS profile. Of all 3 of my printers, I think this printer is creating some of the best prints.


thing:38290


Saturday, February 9, 2013

RepRapPro Mendel (part 3)

I’ve put the MakerGear hot end through hundreds of hours of service without having any problems. Because of this track record, I’m wary of any other system. I've experimented with other hot ends such as the Budaschnozzle and J Head MKIV and I haven't found them to be as reliable.

The RepRapPro hot end will be an interesting new addition and I hope, as reliable as the MakerGear system.

Overall, the assembly was not difficult. The entire system is small and lightweight in comparison to the MakerGear hot end.


The compactness of the hot end assembly can be largely attributed to the system’s employment of a Bowden extruder. Instead of the typical Wades extruder or MakerGear Brutstruder which is attached directly to the hot end and carried on the X carriage, this extruder is mounted on the printer’s frame. The filament is then moved from the extruder to the hot end through an attached PTFE tube. This decreases the weight carried on the X carriage and allows for a greater print speed than the other systems can employ.


The major drawback with using a Bowden cable system is that there can be more oozing and this will leave bumps on the print’s surface. This is due to the increase of springiness in the length of filament that is compressed in the system.
This is my first experience with this type of system and I’m very curious to compare the print results with my other systems.

Electronics

This printer uses the RepRapPro version of the single controller board called the Melzi. It's a board designed to be more plug-and-play and a lower cost alternative to the other controller systems out there. I am not so convinced of this.
RepRapPro Melzi controller

I followed all the test pre-checks with utmost care and found no deviating readings after installing all the electronics. I had full communication through the USB tests with Pronterface, yet when I switched on the 12v supply the drivers and the power supply MOSFET immediately burned.

After checking everything once again, I realized the only mistake I made was that I did not switch the jumper back from USB mode to power supply mode.


Red arrow points to the jumper

According to Adrian at RepRapPro, this should not have burned out the board. I am yet confused as to why this happened.

In the interim, I decided to assemble the alternative, Sanguinololu Rev 1.3a, ATmega 1284P. The drivers I purchased directly from Pololu Robotics. With connectors & USB cable, the entire controller system cost $97 USD.
Sanguinalolu


I ordered a replacement Melzi board from RepRapPro for $139 USD. This is not a cheaper alternative. And coupled with the fact that it's supposed to be an easier controller to use (I have dated, yet formal training in electronics) I managed to burn mine out, so I'm not convinced in its plug-n-play capabilities.

Since my goal is to test this printer as a device that can be used “right out of the box”, I’ve waited for my replacement Melzi board. After carefully transferring all the wiring to the new board, I repeated my pre-check tests and USB communication. Making sure the jumper was moved back to the power supply position, I
turned it on.

Everything is working, all axes are moving smoothly and in the proper directions.

Wednesday, January 2, 2013

RepRapPro Mendel (Part 2)

There’s been quite a few changes made in the x and y-axis assemblies in comparison to the Prusa Mendel model. The most intriguing modification (and one of the reasons why I chose this particular model) is the design of the x carriage.

Presently, it carries one hot end, but it's designed to hold a total of 3. This will allow for a multi-color print in 2 or 3 colors, or 2 hot ends can be employed to print with different materials for the purpose of printing with a dissolvable support material. According to the RepRapPro website, the multiple hot end assembly is still in a testing stage and will be available sometime in 2013 (if the multi-head upgrade isn't available by April, I plan to make my own modifications and experiment using KISSlicer).

Other notable changes:

The Prusa Mendel uses either printed PLA bushings for the smooth z-axis rod or LM8UU bearings. This printer is designed using plastic IGUS bushings.


The design difference in the z-axis assembly is the use of a smaller diameter threaded rod (5M studding) instead of the 8mm rod. This makes more sense since it matches the diameter of the stepper motor’s shaft. The coupler is a piece of poly tube, allowing for slight flexibility.


The belt installation for the x carriage was a joy. I recently made a belt adjustment on my Prusa Mendel and it’s always been a point of frustration. Not with this design. It was very quickly applied.

One of the most welcomed features on this printer is the addition of an adjustable Z endstop. This is another frustrating point in using the Prusa Mendel model. Instead of having to slide the Z stop clamp up and down for adjustment, now a precise homing can be made by turning a knob.


The heat bed is nicely designed by sandwiching the pcb heatbed between an aluminum plate and a MDF insulator creating a nice low-profile print platform.


Monday, December 31, 2012

RepRapPro Mendel

More than a year ago when I began sourcing parts for my Prusa Mendel RepRap from vendors located across North America, Europe and Asia, there were only a handful of companies offering full RepRap 3d printer kits. Today, there are many more companies offering RepRap or variant based kits (an incomplete list here:
http://pinterest.com/finklean/diy-3d-printers/), but by far the most affordable and complete kit available is the one offered by RepRapPro Ltd..

I'm working on a new project that requires a basic RepRap 3d printer that is versatile, reliable and set up to be easily configured. How can I go wrong with a kit designed by Adrian Bowyer? After all, he's the inventor of the RepRap and the man who started the DIY 3d printing revolution.

I didn't document my Prusa Mendel build because there was some good documentation readily available on the web and I didn't feel a need to add more. I’m not going to document an in-depth build of this printer either. What I would like to do, however, is to advertise the completeness of this kit and compare the Prusa Mendel and RepRapPro models.

I ordered the RepRapPro Mendel during the company's Christmas campaign on 24 Nov. and received it on 12 Dec. The entire kit cost 788.00 USD including the shipping charges from the UK to the US.


The kit came well packaged and undamaged. After taking an inventory, I was
surprised to find a number of items that really make this kit complete. Such as:
1) 4mm thick glass plate for the printing surface.
2) 4 clips for mounting the glass
3) 24mm wide roll of Kapton tape
4) 100m of PLA filament
5) 4gb micro SDHC card
These are minor inclusions, but it still shows the amount of thought that has been put into creating this kit.


Once I began assembly of the printer, I found that there's a few minor alterations in the frame assembly in comparison to the Prusa mendel. First, is the addition of a XLR panel plug holder which is attached to the far left foot of the frame.


Second, the frame width has been expanded slightly, increasing the X-axis spread by 20mm. Third, a more efficient mount for the Z-axis rod was designed by incorporating it with the motor mount.


Last, the addition of a diagonal support.


There are 2 design changes in the Y-axis system. The entire motor mount system has been redesigned which gives better support for the motor.


The belt clamp system has been greatly improved. It’s much easier to install and tighten the belt with the addition of a belt tensioner. 


A screw pushes the belt out from the belt clamp allowing for easier tightening.


It’s also worth mentioning that this kit comes with a 2.5T belt and pulley system opposed to the normal 5T belt that is used on the original Prusa Mendel.

Overall, I think the alterations have contributed to the ease of the build. The wiki instructions are not as graphic as the Gary Hodgson instruction manual for the Prusa Mendel, but are clear enough and sufficient so far. The frame assembly actually makes a fun project with young kids; my daughters helped me considerably by patiently stringing nuts and washers on all the rods.