Saturday, November 29, 2014

WhiteAnt 3D Printer Build- Final Update

This will be the last overview of modifications I’ve made to the WhiteAnt 3D printer. The system has been running well and needs no more improvements. It’s been a great machine to use for experimentation of various mechanical and electronic systems, but it’s now time to move on.
The first major modification I’ve made has been with the electronics:

I’ve swapped out the RAMPS 1.2 board for a 1.4 version which allows me to use a Geetech LCD 2004 smart controller. I’ve added a temperature monitor for the build space and I’ve replaced the Makerbot v3.3 stepper drivers (based on the A3977 chip) with the open source designed AVR-Based microstepping bipolar chopper stepper motor driver. This utilizes the National Semiconductor’s LMD18245T 3A, 55V DMOS Full-Bridge Motor driver chips. It’s a robust driver and completely built without surface mounted parts. This gives it an advantage over most drivers because it’s easy to repair. The design can be found here.
I’ve replaced the 6mm T2.5 belts with 9mm T5 belts and 12 tooth pulleys. This, I believe creates a better system for the movement of the XY axes. I also re-designed the pulley system for the X axis.


Last, I’ve created a partial enclosure of the build volume. This allows me to keep some of the heat generated by the build plate and hotend within the build chamber. Now, that I’m in winter months and the ambient temperature of my shop has lowered, this has been important.


Here are a series of sculptures printed with the WhiteAnt. They are 150mm, 100mm and 50mm tall.


Notice the difference in the surface detail between the three models:
Close-up of the 150mm sculpture. The radial pattern is more defined in this largest model.


Close-up of the 100mm sculpture. The radial pattern begins to fade.

Close-up of the 50mm sculpture. The radial pattern is barely discernible.


Here’s a video of the WhiteAnt printing the largest version:


Thursday, July 3, 2014

3D printing with RepRap Cookbook


Fall of 2012,  I was contacted by Packt Publishing a small UK based publisher of technology books and videos. They were in search of an author for their book 3D Printing with Reprap Cookbook.

I submitted an outline for proposal later that year and in short time, it was chosen for publication. I signed my contract in December of 2012.

Working with the Packt team of editors and reviewers was a wonderful experience. The actual writing was not. There was a lot more information that I needed for this book than what I had acquired through my experimentation, so this meant I had to thoroughly research topics that I previously felt comfortable with. I also decided to approach two color printing in this book and alternate material extrusion such as clay for ceramics. This was not a good idea. It led to building two more printers to handle this task and in turn-- just created more unnecessary work in an all ready busy day.

During this time I was heavily involved with my profession as a scenic artist. I was the scenic department head on a full season of Veep and a season of Turn: Washington Spies. In between these two cable series I also worked on the docu-drama Killing Lincoln. Along with all this work I'm an active parent of twin girls age 5. Finding time to write was a challenge.

Unfortunately, I was unable to meet my contractual agreement and the book was not completed on time. After some negotiation, it was agreed that there was a lot of good material in the book project so far and an attempt should be made to complete it.

In June 2013 I signed a new author contract and with a fresh team from Packt, continued to complete the book. This is now all in the past and I'm pleased to announce the publication of my book on June 24, 2014. It's available from Packt Publishing, Amazon and other book sellers.

Because of Packt Publishing's affiliation with Safaribooksonline, it's also available in many university libraries worldwide. A full list can be found on the Worldcat library catalog.

Saturday, February 22, 2014

Rostock Delta Robot- Commissioning

Setting up the firmware for this printer hasn't been much more difficult than the linear style RepRaps that I've built previously. It's simply been different.

The major difference has been overcoming the limitations of the computational speed of the Arduino hardware. Using the latest  jcrocholl / Marlin firmware from GitHub, I found that the printer would stall for upwards of 5 sec. periodically throughout printing. This is because with a Delta system, there is more computation required to calculate each point in space. In order to ease the buffer load of the Arduino, I had to make some adjustments in the firmware, particularly of the Delta Segments and Acceleration values.

Under this line:               Delta Printer
I changed:                      #define BAUDRATE 250000
To:                                 #define BAUDRATE 115200

Under this line:                #define DELTA
I changed:                       #define DELTA_SEGMENTS_PER_SECOND 200
To:                                 #define DELTA_SEGMENTS_PER_SECOND 100

Under this line:                //// MOVEMENT SETTINGS
I changed:                      #define DEFAULT_MAX_ACCELERATION      {9000,9000,9000,9000}  
To:                                 #define DEFAULT_MAX_ACCELERATION      {4000,4000,4000,9000}

After making these changes, the pauses ended and the printer has been successful in making prints runs up to 6 hours long.

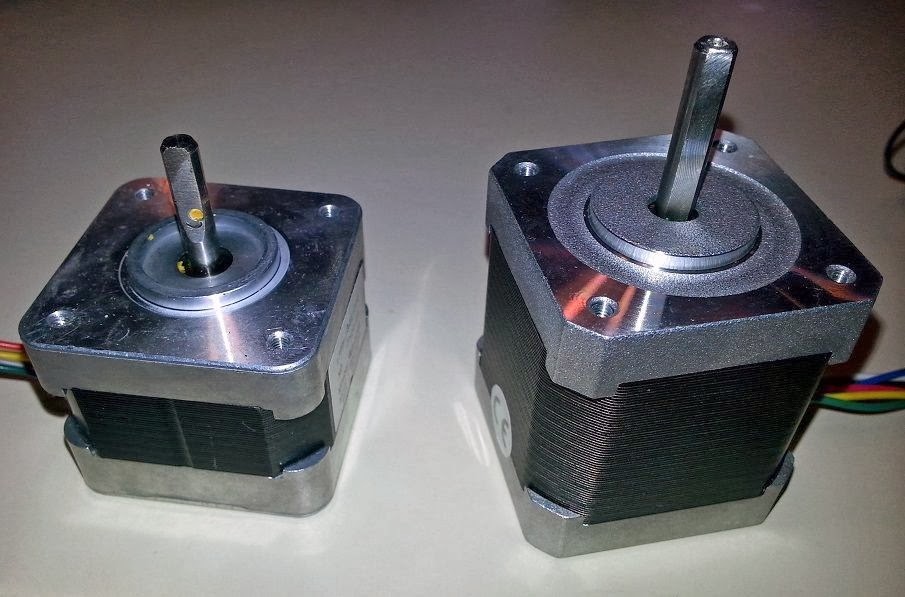
Another change I made was with the mechanical function of the printer. I had originally installed some bargain bi-polar stepper motors that I got on eBay. These were not supplying enough torque. During long print runs, a stepper would skip and the print would be lost.

I changed to 3 bi-polar stepper motors that I purchased from www.pololu.com. They are NEMA 17-size and have a holding torque of 3.2 kg-cm (44 oz-in).

Unknown size on left. On right is a 44oz-in NEMA 17

I also added heat sinks to the Pololu A4988 drivers and a cooling fan. Since this change, I haven't had any problems with missed steps.

 Another change I made was with the hot end. I was wired up with the E3D-v5 hot end, but I haven't had much luck with it. I swapped it out with the hot end design from RepRap Pro. This hot end has become my favorite along with the Maker Gear hot end.


The filament feed works beautifully by using a spool box from what was www.thefutureis3d.com. The site is now linked to www.indimension3.com and I don't see the item available. I'm sure one can be made easily since it's basically a box and lazy susan device. What is nice about this particular spool box is how nicely it fits on top of the Rostock frame.


Printing has been of fairly good quality. I'm still working out some issues with cooling. Even with the orbit feature of Skeinforge, I'm getting too much distortion on the fine tips of pyramids and cones.


A cooling fan will help solve these issues, but I prefer to keep the mechanical parts to a minimum.

Overall, I consider this printer to be my second best for printing large pieces. The build envelope is roughly 180mmx180mmx350mm (7" x 7" x 13-3/4").