Showing posts with label 3d Software. Show all posts

Wednesday, July 20, 2016

Interfaces

The most common human interface device with a computer is a mouse and keyboard. We’ll take a look at other useful interfaces for working with 3D modeling software.

Graphics tablet
A graphics tablet is a special drawing board that works with a pen-like stylus. It’s been the primary interface for use with graphics and digital painting software and it can be useful for 3D sculpting as well.
A graphics tablet system is similar to writing with a traditional pen on paper. A stylus has a pressure sensitive nib which responds to the pressure exerted on the graphic tablet’s surface. This allows a more natural method of manipulating brushes and sculpting tools within 3D modeling software.
Some software is not capable of utilizing the pressure sensitive capabilities (such as Meshmixer), but can be still used as a mouse type device. Hard modelers (such as Sketchup Make or Fusion 3D) are cumbersome to work with while using a stylus. They are better suited with a traditional mouse.
Wacom is one maker of the graphics tablet. The Bamboo Capture Pen and Touch Tablet is featured here and costs 100 USD. Newer models are available and they vary in price depending on the size. It’s fully compatible with 3D-Coat.
Space mouse
Most 3D modeling software requires toggling (by way of menu selection or by keyboard) in order to use the mouse to navigate the camera view. This interrupts the primary work in order to gain a better view.
The space mouse is an additional peripheral device that works in tandem with other peripherals such as a mouse or graphics tablet. It allows navigation with the left hand and mouse usage with the right hand (or vice versa). This allows for 360° of navigation freedom with zooming and panning. It also relieves wrist fatigue by separating the work load between two hands.
3Dconnexion is one maker of the space mouse. They have various models, some incorporating an ergonomic platform that has programmable keys and LCD displays.The SpaceMouse wireless is featured here and it’s available for about 125 USD. It’s fully compatible with 3D-Coat, Sketchup Make and Fusion 360.

Next: 3D scanning. There has to be an easier way of creating 3D models, right? 3D scanning may provide you with the solution.

Sunday, July 10, 2016

3D Modeling


There’s a variety of 3D modeling software offering many types of approaches for creating three-dimensional forms. Deciding which one to use will depend primarily on the style of work, the steepness of the learning curve, and how much the software costs.
Optimizing the 3D modeling experience
3D modeling software can be divided into two kinds of modelers, hard and soft modeling. Both approaches have their advantages and disadvantages, yet by combining the software a workflow can be created that will optimize the 3D modeling experience.
For example, the concept is hard modeled as a geometric form with Sketchup Make. And then soft modeled with Meshmixer. By using these two different software programs, the basic structure could be quickly built with precision and then modeled further into a natural organic form. Utilizing these two approaches, virtually anything can be modeled.

Let's take a closer look at this concept.

Soft modeling
Soft modeling works best for creating organic forms. By using an assortment of tools, such as flatten, pinch and smooth, the surface of a model can be shaped into realistic forms and textures. The following soft modeling software is recommended for its functionality and modest learning curve.

Meshmixer
Meshmixer has a good variety of sculpting tools that can be adjusted for different characteristics, such as strength, size, and depth. It also utilizes a stencil feature which allows for the application of physical textures on the surface of the model. One of the most significant features of Meshmixer is its collection of parts. 

A variety of primitives, shapes, and human and animal parts can be added together and transformed in countless configurations. These parts can be utilized to create base forms that can be reshaped later with the sculpting tools.
Meshmixer is provided free by Autodesk and it can be downloaded at their site http://meshmixer.com/download.html.

3D-Coat
3D-Coat is a professional digital sculpting program that works more like real clay than most other programs. Using a voxel (volumetric) system, it actually carves into the model as a solid, rather than displacing the topological surface. This allows for digging into the actual form (creating negative space and holes) with much better results than other soft modelers.  

3D-Coat also has a powerful layers system called a voxtree. This allows modeling of complicated forms that have many parts. Individual parts of the model can then be isolated for specific modeling or they can be exported as individual parts for 3D printing. This creates the possibility of creating sculptural assemblages larger than the build volume of a 3D printer.
3D-Coat incorporates a 3D painting system as well. The model can be rotated and digitally painted with tools that work very similar as the tools in photo editing software. If your sculpture is to be painted with traditional materials, this can be a very quick means for pre-visualization.
3D-Coat is a commercial program offered by Pilgway and it can be downloaded at http://3dcoat.com/download/. A 30 day trial is available with all features intact. An amateur version with less features is available for 99 USD. Full professional version is 379 USD.

Hard Modelers
Hard modelers work more like CAD drafting programs. They create straight lines and curves with the precision of real world measurements. Because of these traits, they can be useful for creating parts that need to be precisely integrated with objects. They also model complex geometric forms with far greater ease than a soft modeler. The following hard modeling software is recommended for its functionality and low cost.
Sketchup Make
Sketchup Make has one of the lowest learning curves for a hard modeler. It works by drawing lines and basic shapes (such as rectangles and circles) and then extrudes these drawn shapes into a 3D model. 
It has an intuitive approach to modeling that makes it easy to build complex mechanical parts or geometric constructions that can be exported into other programs for soft modeling.
Sketchup Make is a free program offered by Trimble and it can be downloaded at http://www.sketchup.com/download. It begins with a 30 day trial as the Sketchup Pro version. The pro version costs 695 USD and adds more functionality, such as solid modeling tools.

Fusion 360
Fusion 360 is a powerful tool for creating industrial and mechanical designs. It models with a system of T-splines, which are mathematical representations of curves and surfaces. The learning curve for this software is moderately difficult due its many features.
One of it’s most significant features is its ability to create a shape around an imported mesh (such as a 3D scanned model) and copy the contour of the form. This provides the artist with a means for creating precise parts that can be attached to real world objects.
For an artist who works with hard edged forms that rely on geometric precision, Fusion 360 will provide the best tools for creating a 3D model.
Fusion 360 is a commercial cloud based program offered by Autodesk. It has a 30 day free trial with all features intact. Professional usage has a 30 USD cost per month or 300 USD cost per year. Hobbyist and startup companies can register for free use.

Up Next: InterfacesWorking with a 3D modeler is more enjoyable if it becomes more accessible as a tool in an artist’s hands. We’ll look at some affordable human interface devices.

Sunday, August 11, 2013

Printrbot Commissioning

I've completed my Printrbot's mechanical and electronic systems and now I need to tweak the programming and software for operational control of the printer. This requires a little more work with a Sanguinololu board than what's required with an Arduino based controller.

In order to load the firmware on the Sanguinololu, I had to first install a Virtual Com Port USB driver from http://www.ftdichip.com/Drivers/VCP.htm. I then plugged my Sanguinololu into a USB port and directed the Detected New Hardware prompt to the CDM driver folder. Once a port was established, my Sanguino was recognized by Windows.

Next, I needed to download a pre 1.0 version of Arduino software. I'm using 0023 and it can be found here http://arduino.cc/en/Main/Software. The Arduino program needs to be set up with some new files and a modified avrdude.conf file. I downloaded Sanguino1284p-master.zip from here https://github.com/jmgiacalone/sanguino1284p. I added the contents to the hardware folder of arduino-0023. Allow Windows to merge the tools folder and overwrite the avrdude.conf file. Now the Arduino software will recognize the Sanguino.

Next, I needed an updated version of Marlin firmware. I downloaded Marlin-Marlin_v1 from here https://github.com/ErikZalm/Marlin.

Next I needed to edit the Marlin firmware with the Arduino software. I opened the Configuration.h file and first changed the electronics board setup from the default:
#define MOTHERBOARD 33
to:
#define MOTHERBOARD 62

Next I had to get my mechanical settings corrected specifically for my Printrbot.
Under:
 // Endstop Settings
I changed the default values “true” to "false" in these 3 lines:
const bool X_ENDSTOPS_INVERTING = false;
const bool y_ENDSTOPS_INVERTING = false;
const bool Z_ENDSTOPS_INVERTING = false;
Under:
// Disable axis when it’s not being used.
I changed the default values "true" to "false" in the first 2 lines:
#define DISABLE_X false
#define DISABLE_Y false
I also changed the build volume to Printrbot size:
#define X_MAX_Length 100
#define Y_MAX_Length 100
#define Z_MAX_Length 80

Next, in order for the new fan circuit to be operative, a change needed to be made in the pins.h tab.
Under:
 *Sanguinololu pin assignment
I changed the default value -1 to:
#define FAN_PIN   4

Of course, the usual changes need to be made to the movement settings in the firmware during calibration. Finally, the edited Marlin firmware can be uploaded to the Sanguinololu.

I'm using Printrun as a host. There’s a few things to do here as well. Under Options from the Settings menu, I changed the build_ dimensions to 100x100x80. I then selected the correct port for my USB connection and set the baudrate to match my firmware.

For my first test runs, I used PLA filament and Slic3r. Slic3r has better fan control options and since this is my first printer equipped with a fan, I’d like to test the system more throughly. I used the 5mm cube steps pyramid calibration test (thing:56003) for my first run.


The fan cooling system certainly works very well for areas which are usually more difficult to print without the additional cooling.


Next, I ran some bridging tests. I made a 25x25mm open cube.


There is the slightest hint of one drooping strand on the print and several others that were printed.


Last, I ran a bridging test using the bridge torture test (thing:12925). This model requires a span of 50mm to be printed from 2 posts.


With some tweaking of the slicer options, A successful print was made.

Monday, October 8, 2012

WhiteAnt 3d Printer Build- Print Volume Test


Since my plan is to eventually print sculptures that are primarily organic in form, I decided to create a more interesting test print (rather than the basic geometric forms I've been using lately).

Earlier this year, I used Bryce 7 Pro to create some fractal based landscapes which filled the print bed of my Prusa Mendel 3d printer. It was a quick modeling solution, but I think this time not appropriate for this particular test. The print time for a Bryce Pro landscape on this printer would take days, rather than hours.


My solution this time for creating a test model is a freeware program called Incendia Ex. It's a traditional fractal generator that has the very useful function of allowing a generated form to be saved as an .obj or .stl file.


Incendia Ex


Once I had a 3d model generated by Incendia Ex, I then needed to import it to a 3d modeling program for modification. Most of my experience using 3d modeling software to date has been with Google SketchUp. It’s great for designing 3d printable forms when they are mechanical in nature, but not for organic models. I need  a sculpting program that has an artist in mind.


Hexagon 2.5

I’m using Hexagon 2.5 from Daz3d. It's not my first pick of 3d modeling programs, but it’s presently given away free from the software company ( it’s fully functional with a serial number). With Hexagon, I was able to slice forms apart, tighten their connections for structural integrity and cap holes.


Netfabb

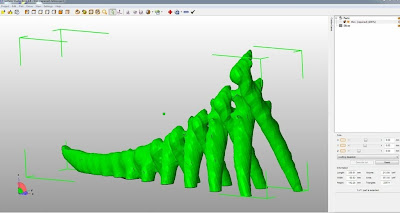
With the model complete, I had one last step to prepare it for printing. I imported it into the free version of Netfabb. This program basically repaired the mesh of my model of small holes or non-manifold geometry. In order  for the model to print correctly, the 3d model’s mesh must be clean and watertight.


The model's size is 330mmx60mmx142mm (13"x2-3/8"x5-1/2”) and took 5 1/2 hours to print.


Friday, May 11, 2012

3d Printing Natural Forms I


I decided to start a series of samples that would explore different textures and
how these textures will translate by 3d printing. The easiest way I found to
generate the models I need was with a 3d program popular with designing
environments, Bryce 7 Pro. Within  minutes it’s easy to create mountains or
other landscape elements and export the model as a mesh.
Unfortunately, the ease ends here, or at least for me since my background with
working with 3d programs is very limited. Through my trial and error, I
eventually developed a workflow that provided me with a model that could be 3d
printed.
Here is a summary:

1) Bryce 7 Pro, basically start up the program and click on the mountain icon
and a wire frame mountain appears. Playing around with the edit features will
model the mountain with an infinite array of features. I started with a typical
projection with fractal eroded surfaces. I exported the wire frame as a wavefront .obj file.


Bryce working environment.


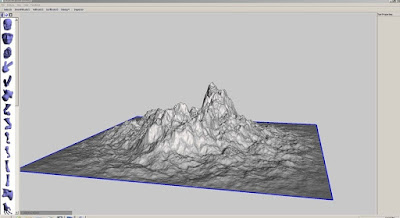
2) Meshmixer 07, is an open source program and a very important one for me since it's relatively easy to learn and it was my best option of capping the mountain I made in Bryce. For 3d printing, a model must be a solid. The mountain I made
in Bryce is basically hollow with an open bottom, essentially a shell. There is a great YouTube video showing how to enclose a model such as this here. The modified mesh was exported as an .obj file.


Meshmix working environment.


Under the mountain model before it's capped.


3) Rhino 4.0, is a very popular and powerful 3d design program. I would have
used a simpler program like Google Sketchup, but my file was too complex and it
couldn't handle it. Rhino has an evaluation copy that will only allow 25 saves,
this is what I used. This program was important for 2 reasons (which I couldn't
solve with Meshmixer): I needed to scale the object and I needed to orient it
properly within the Cartesian space coordinates. I quickly discovered this problem
after trying to print; the model was on it's side and only about 8mm square in
size. Rhino was able to correct all of this and export as an .obj file.


Rhino working environment. Here the model is shown positioned upside down in the coordinate system. It would slice and print this way if left unrotated.


4) Meshlab 1.3.0a, is an open source program used for merging and fixing meshes
for printing. I ran my model through this and exported as a .stl file. But once
I started to slice my .stl file with Skeinforge, I found that I didn't quite fix
all my problems with Meshlab. I still had a hole in my model somewhere.

It took an hour to slice and I didn't want to go back and try to fix it, so I
printed the model with the errors. The only problems I could see
with the print was an irregular start on the base and the print printed solid
even though I had my fill ratio set at 10%.


Even though base was capped square, the print started irregularly.

I also had a slight problem with warping. The print on one side lifted enough
that it actually cracked the glass, but the print overall is quite flat.


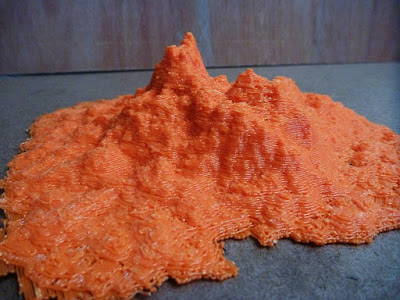
Mountain


Aesthetically, I'm not too happy with the overall look. It kind of reminds me of
the mealy texture of paper pulp. Also the "architectural" resolution is poor,
but this is probably due to the 3d modeling.


Sunday, April 1, 2012

Google SketchUp

Now that I have a 3d printer running, I’m ready to explore different means of
creating content for printing. The first program that I’ve decided to use is
Google's free edition of SketchUp. I have no experience with CAD or 3d graphics
programs, yet I found SketchUp to be an easy program to absorb quickly after watching a series of videos from http://sketchup.google.com/training/videos.html.
With a little trial and error, I was able to make some pieces that I need for a camera/laser rig for 3d scanning.

Laser cradle.

Tower brace.

Stepper motor mount.


Completed system with printed parts and devices.

The free program does not export to .obj or .stl files but with a free plugin
from  http://www.guitar-list.com/download-software/convert-sketchup-skp-files-dxf-or-stl 
I was able to save my designs as a .stl and view them for problems with another
free program called Meshlab. I really don't foresee using SketchUp very often, but for fabricating parts for future projects, I am amazed when I think of the possibilities.